Showing posts with label TCP 101. Show all posts

Tuesday, December 8, 2015

TCP 103: Port Scanning with Scapy

In TCP 101 and TCP 102, we learned how to manipulate TCP with a RAW_SOCKET. Welp, doing it that way all the time would suck. Thankfully, there's a module for that: scapy! We used pure socket before because I wanted you to understand what's under the hood when dealing with TCP/IP, or else the Scapy module would be kind of hard to wrap your head around.

Scapy is not a default module on Ubuntu or the like. You may need to install it on your distribution:
sudo apt-get install python-scapy

The Scapy Overview

Scapy is a great module for manipulating interface traffic. I recommend grabbing the PDF documentation for it here and here for reference. It can be used from everything to building sniffers to crafting your own custom packets. If you're getting into security, scapy is a must-know module. Take a look through the documentation at the link provided to get a glimpse at what's under Scapy's skirt. 

In this post we will be testing scapy on some port scanning concepts to familiarize you with the module.

The Half-Open Scan (Stealth Scan)

A half-open scan, as the name suggests is a type of SYN scan where we don't complete a full TCP handshake. It is also called a stealth scan (option -Ss in NMAP). You might be wondering why exactly it is called a stealth scan. Remember our little client and server application from TCP 101? You may have noticed our server did not actually record the IPv4 address until the TCP handshake was completed. That is exactly why a half-open scan is called a stealth scan. Let's see the code in action.

tcp_half.py


server.py (from TCP 101)


Fire up 2 VMs again like in TCP 101. Take our server.py code and launch it on our server and fire off a half-open TCP connection.
Figure 1: We fire off our half_open scan.
Figure 2: Not a peep from our server.py script.
Figure 3: We can clearly see a SYN, RST packet from our Ubuntu VM at 10.0.2.5 - indicators of a stealth scan.
In figure 1, we can see we receive back a SYN-ACK from our server (flags = SA). This indicates that port 12345 is open. If we had received back a RST-ACK from the server (flags = RA), it would indicate the port is closed.

So what is happening here?

When we fire off tcp_half.py it sends a single SYN packet. Our server replies with the SYN-ACK to try to finish it's TCP handshake in order to establish a complete connection. Instead we stop the connection and send a RST. The server will then drop the connection, hence why this is a half-open scan. We only connect half way and stop the connection. Our server never records our IP and just assumes we failed to connect because of network gremlins.  

Let's do a walkthrough of the tcp_half.py script, since it's new to you:

Line 1: We import scapy. You may have gotten an error if you tried to run this: "there ain't no damn scapy module bro." Or something like that. If that's the case:
sudo apt-get install python-scapy
Line 4: IP(args): We craft our IPv4 header. We set the source and destination address. In the link provided, it lists out the available arguments, data type, and default values for the IP() object. Much easier than dealing with struct and packing all the damn data up for the built in socket module. 

Line 5: TCP(args): Here is where we craft the TCP header. We set the source port to 1024, our destination port to 12345, and our flags value to "S" for "SYN". Lastly we set the sequence id to 12345, which is important to make sure our packets send and receive in order. A list of arguments for TCP: 
Figure 4: To find a list of arguments you can open a python console and import scapy. run ls(arg) to print out a list of commands.
Scapy documentation can be a bit daunting to trove through, but it's still pretty intuitive. How do you think you'd set "flags" for a FIN? flags="F" What about a FIN-ACK? flags="FA"

Line 7: Here we create our packet. We add in an IPv4 header then a TCP header. We do not need to craft an ethernet header since we are not manipulating any information at the data link layer. 

Line 9: sr1(args) [page35 & 36]: We set p to the returned object of sr1(). SR1 sends our packet "packet" and will only capture and return the first answer it receives. It is best used for single packet probes like we are doing for port scanning. We only care to know what the server's response is, which will come as a reply to our packet. The inter=1 command is the time in seconds to wait in between each packet.

Line 10: p.show(): Print out the parsed data from our packets so we can view it. In this case it will be the single packet captured from sr1 in line 9. 

Lines 12 thru 15: Same difference as crafting our SYN. The difference is we fire off our RST right away after the SYN waits 1 second. 

The FIN Scan:

Modern day security equipment like various firewalls and IDS/IPS systems can easily detect SYN scans. A FIN scan is a good way to do a port scan around most firewalls and IDS systems. We send the remote host a FIN packet. If there is no response from the remote host, there is a good probability the port is actually open. If we receive a RST-ACK, the port is closed.

Figure 5: We fire off our FIN and get no response. Yay! The port is open.

Figure 6: Our server is as oblivious as always.
Figure 7: We can see the FIN reached our server. Our server does nothing when it receives it.
To play around with it, firewall off your servers listening port with an IP tables rule. You'll receive a RST-ACK when you send the FIN to port 12345.

The ACK Flag Scan:

An ACK flag scan is best suited to probe if firewalls, IPS or other related network security controls are between you and your target host. With this method we send an ACK packet with a random sequence number. No response means the port is either filtered or open. On the contrary, if we receive a RST-ACK, the port is closed.  


For this example I will probe telnet, which is pretty much firewalled off most of the internet.
Figure 8: We send an ACK and get back a RST. The port is closed by a firewall.

Figure 9: We receive the RST-ACK by our application. 

XMAS Scan:

This involves sending basically a bunch of flags all at once (FPU) and seeing what bounces back. You could say the packet was 'lit up like a christmas tree.' Typically if the port is closed, you'll get an RST. If the port is filtered you will get nothing back.


Figure 10: We Send our FIN-PSH-URG and receive back a RST-ACK. Telnet is closed on the remote host.

Figure 11: Packet capture of a successful XMAS Scan.

Reinforcing the Concepts:

If you need something to do to reinforce these concepts, build yourself a little port scanner with scapy. You could pretty much wrap all the code here into some functions, that way you'll have them for later on. Play around with scapy, a VM, IPTables and Wireshark. It's a very powerful tool for packet manipulation! Merry XMAS scanning!

Saturday, December 5, 2015

TCP 102: Sniffing TCP Traffic

In part 1, we went over the TCP handshake and some basic structure on how a client and a server will communicate with each other over a network. In this section I will be reviewing the structure of an actual TCP packet, and going over how we sniff this traffic on our local interface.

The Structure of a TCP/IP

You may have heard of TCP sometimes referred to TCP/IP. This is due to TCP only being one part (or one frame) of what allows you to talk to other systems over an information network. Without IP (Internet Protocol) TCP would be an incomplete connection. Networks would get confused as to where they're supposed to route your connection. What makes up a TCP packet are actually two layers of encapsulation. There are two 'headers': The IP Header and the TCP Header. To get technical for a second with something not many people care about, TCP is part of the Protocol Data Unit (PDU) within IP. You could also say a UDP packet is the same - it lies in the PDU of IP. 

Imagine that TCP is layered inside of IP, like this:

The IP Header

It's easiest to imagine TCP/IP headers like a grid. You have 32 bits across as columns (or 4 bytes), and 5 rows of these (making up 20 bytes of information total). It's much easier to imagine in a visual:
Don't get overwhelmed with all the bells and whistles in there. Stick to what is familiar to help you understand it: The source and destination address (at offset 12 and 16 respectively).
A quick refresher on Bits and Bytes: 
You may or may not know that IPv4 addresses can only go up to 255 per octet. For example: 192.168.0.255. If we changed it to 192.168.0.256 we would get an error and no connection could be established, because that type of addressing doesn't exist. You would get an overflow in an 8-bit unsigned and your interfacing module (like socket) would toss out an exception.

If we were a programmer from 1979, how would we get the source and destination address for an IPv4 address?

By starting at offset 12 in our array and grabbing 1 byte at a time for 4 bytes to get the source, and the same at offset 16 for our destination! I will provide an example below.

Ping contains no PDU (as in no TCP or UDP header). It just uses pure IP. I fired up wireshark again and did a ping to Google's DNS server at 8.8.8.8:

Wireshark has the source address highlighted. This would be at offset 12 in our grid. We see the information: 0a 00 02 0f as our source address. So how is this information populated? It doesn't look like an IP address at all.

First, let's take our source address, 10.0.2.15. You can see it's IP address highlighted in the main window (at No. 3).

Let's convert each octet of 10.0.2.15 to binary first:
10:   0000 1010
0:     0000 0000
2:     0000 0010
15:   0000 1111
Next convert these binary values into Hex (a base 16 number):
0000 1010:   0A (or 0x0a)
0000 0000:   00 (or 0x00)
0000 0010:   02 (or 0x02)
0000 1111:   0F (or 0x0f)
If it's not making sense now I'll explain it. Decimal (base 10) has a total of 10 numbers ranging from 0 to 9:
0123456789

Hexadecimal or Hex (base 16) is alphanumeric. It's digits range from 0 to F:
0123456789abcdef
A represents 10 in decimal...
B represents 11 in decimal...
...
F represents 15 in decimal
The 0000 value is the first part of the byte. Hence why hex has two characters. If 0000 1111 is 0F and represents 15, then 1111 1111 is FF and represents 255, our maximum value.


Now that we have our source address, we can count the next 4 bytes in our packet capture. You can see at the above information this is 08 08 08 08 and would mark our destination address.

In wireshark try clicking on the start of the Internet Protocol Version 4 information and manually counting and mapping out the bytes. It will be displayed in hex, so 1 series of 2 characters separated by spaces represents 1 byte. See if you can align up all the bytes to the IPv4 chart up top to help you get familiar with it.


The TCP Header

Hopefully now you have an idea on how the headers are constructed. Below is a TCP header:


You can see there is no addressing information contained in a TCP header. Just port information. Again if none of this information is making sense stick to what is familiar: The Source Port, Destination Port and Flags. If you remember from part 1 (and did the homework), the flags are what determine what type of TCP packet is being sent or received (like SYN or ACK).

You'll see our source and destination ports are 2 bytes, or 16 bit unsigned values. Which give a range of numbers from 0 to 65,535. If you haven't noticed, we can only have a maximum port value of 65535. :) Now you know why. If we went over that amount we'd throw an exception because the value would overflow and no longer make sense. It would turn into a negative number. A list of well-known ports can be found here.

Coding a Sniffer

Let's put all this new information to use and build a sniffer for our local interface. The code to do this is below:

Before this can run, you need to set your interface to promiscuous mode: 
ifconfig eth0 promisc 
or ifconfig interface promisc

This code may look daunting at first. But let's break it down one by one.

On line 6, you'll notice that we have a new type of family and socket used for our socket creation. PF_PACKET and SOCK_RAW, as well as an additional argument ntohs(0x0800).

This is self explanatory. Capture everything in a raw format.
socket.PF_PACKET
Oddly enough, there is no Python documentation on this. PF means we want to capture things from the Protocol Family. AF_INET for example would mean Address Family, Internet Protocol Version 4. By specifying PF_PACKET we are telling Python we want to manipulate the packets at the lowest level we can. Note that this only works on Linux. It was introduced in Python 2.0.
socket.ntohs(args)
We are telling python to convert 16-bit numbers (like port info) into host-byte order. Since we are working low enough level we need to worry about Big Endian and Little Endian. Or the order the bytes stream into the interface, to put it plainly. Our argument 0x0800 is telling socket we only are interested in ETH_P_IP (Internet Protocol Packets). To see what the heck I'm talking about, run: nano /usr/include/linux/if_ether.h and look for the "ETH_P_IP" or 0x0800 entry: 
note the entry for ARP. Might be important later :D


Our next section sets a variable pkt, which receives a maximum 2048 bytes from the socket. 
Before we move beyond line 10 in our code uncomment line 11 (prints pkt in raw format), and comment out every line below line 11. Run the sniffer.py program and ping google.com:

This will print out our packet data in raw format. As you can see pkt returns a tuple data type.
Interacting with them works similar to an array, but we can slice into specific parts of specific array addresses. 

In line 13 we do exactly that. We are going to the first section of our tuple, where all of our packed C-type data is, and slicing bytes 14 thru 34 out into a variable: ipheader.

Now we need to unpack this data on line 14. This is where our knowledge of the byte-level structure of the IP header becomes super important.


We need to break our argument, !8sB3s4s4s down piece by piece for it to make sense.

First up is the "!" character:
This specifies the endianness. In this case we set it to network. You can see a list of endianness we can set with this chart here. The chart that maps C types to Python data types is here.
Next is 8s:
This specifies we want to read in the next 8 bytes as a string. If you skip up to the IPv4 header chart, this would be the first 2 lines - or first 8 bytes. In our split array we assign this to address 0 in our ip_hdr array.
B:
This specifies we want to read in the next byte as an unsigned char, or an integer in python. If you need a road map of where we're out now in our IPv4 header, we are at TTL. We assign this to address 1 in our array.
3s:
This specifies we want the next 3 chars to be assigned to a string. In our IPv4 header this would address the protocol and header checksum into a single string and set it to address 2 in our array.
4s:
You may have guessed now this is the Source Address. We take the next 4 bytes (chars in C) and assign it to address 3 in our ip_hdr array.
4s:
And if you look at the last 4 of the 20 bytes (20-4 = 16, or offset 16) for our IPv4 header - that's right. It's the Destination Address! We set these next 4 bytes (chars) to address 4 in our ip_hdr array.
Then we print some stuff and now we are down to line 16. Remember from the prvious section we set our TTL to address 1? Well we can print it out here with ip_hdr[1].

You might be dreading this next line because we have to deal with more C types, but that's not the case. On lines 17 and 18 we do the same thing: convert some information into an IP address.

socket.inet_ntoa(packed_ip):
Remember we set the ! flag in struct object? This sets it to network. You could read ntoa as Network to Address. We are taking a packed IP and converting it to the standard dot notation for an IPv4 address that we're familiar with. In this case we set ip_hdr[3] as our Source Address and ip_hdr[4] as our Destination Address. If we pass them in as arguments, we can print them as a string. 
And Bob's yer Uncle. Now we've unpacked information about the IPv4 header. Let's do the TCP header next.


Unpacking the TCP Header:

Our interface is pretty much sending a stream of data to us. We know right after the IPv4 header, the TCP header hits our interface. We can unpack it in the same way we did the IPv4 header.

I'll walk through how we got the Source and Destination Ports first out of "!HH9ss6s":
!:  Network flag, you know, since we're working with network stuff.
H:  In a TCP header the Source Port comes first. This takes the next two bytes (which are unsigned shorts) and sets them to a Python integer. We set this to address 0 in our tcp_hdr array.
H:  The next series of 2 bytes in offset 0 of our TCP header is the Destination Port. This is also an unsigned short, so we assign it to an integer value in Python. We set this to address 1 in our tcp_hdr array.
9s:  We take the next 9 bytes and set them to a string type in Python. This would be the sequence and acknowledgement numbers, as well as the "offset" and "reserved" bytes. This gets set to address 2 in our tcp_hdr array.
s:  This one takes the next byte and assigns it to a string type in python. In this case we are taking our TCP flags and setting as a string and storing it at address 3 in our tcp_hdr array.
6s:  This sets the rest of the TCP header to address 4 in our tcp_hdr array. We don't care about them for now.

Now we just print out the source and destination ports on line 24 and 25.

binascii.hexlify(args):
On line 26, we convert the flags information (which got unpacked as binary) into a hexadecimal amount, so it makes sense to us.

Doing some Homework:

Phew. That was a lot of data to digest. Don't give up here though. I recommend practicing with struct: See if you can unpack the entire IPv4 header and TCP header by each of their respective items as outlined in their respective charts and print them.

As always, if you have any questions - please ask! You can PM me @ /u/Brave_Little_Roaster on Reddit, or comment here.

Tuesday, December 1, 2015

TCP 101: Understanding and Manipulating TCP with Python (part 1)

After teaching more than a few people, I have found many people find TCP is much easier to understand when you're able to interact with it directly. Throughout this series I hope I can demonstrate TCP connections and interacting with them through Python. This is intended for security or programming novices. As in noobs, students, or curious individuals. Keep that audience in mind.

This first part will go over very basic handling of TCP with Python, and should be a resource you're using to try to augment what you've probably already learned within networking. Later on I will be discussing the cool shit you can do via packet manipulation with Python (spoofing addresses, arp poisoning, etc.). But let's build up that foundation first. Hopefully after this you'll be able to understand the full stack of why things are happening with TCP and what's behind them.

Recommended Prior Knowledge:

To participate in these exercises, you'll need some basic knowledge of networking, virtualization, and basic skills with Python. I highly recommend Learn Python the Hard Way. Read that book and you'll be able to pick up the modules we'll be using in this series no problem.   

Setup:

Virtual Machine Setup

You need two Linux boxes. For the purposes of this exercise, I recommend a Debian build like Ubuntu. It's what I'll be using, since no additional setup is needed beyond a bare-bones install of 14.04 LTS and an apt-get update && apt-get upgrade. Setup a couple Ubuntu VMs on your host machine in NAT mode (applies to either VMWare or VirtualBox):

I'll be using VirtualBox. It's free here.
Unlike VMWare Player, we have to create a NAT. This can be done in the global preferences menu on the "Network" sidebar tab.

The defaults NAT settings will work for this exercise. Next we need to set our VM interface to use this NAT in order to be given a unique IP:

Fire up your VMs and grab their IPs with ifconfig, we'll need them for later.
Now our little lab setup looks like this:
Now everyone has an interface on the same subnet.

Gedit Setup

This step is optional, but I often see a lot of newbies get hung up on stupid crap. A lot of beginners get worried about needing some crazy IDE setup. 9/10 times for Python all you need is a text editor with syntax highlighting, like we'll setup here. Use whatever works best with you. Just don't use an IDE as a crutch, especially if you're just starting out. 

To launch gedit, search for it in the Unity launcher or just type 'gedit' into the terminal and hit enter.
Now go to Edit >> Preferences.

I recommend these settings, but again it's all personal preference. "Insert spaces instead of tabs" set to 4 is necessary though.


The Socket Module and You

Finally, let's get to writing some code! We'll be using Python's socket module. It's fantastic and really there is no reason you shouldn't be using it for anything involving Python and low level interaction with network interfaces. I'm not going to splat some code on here and call it a day, through. I'm going to walk you through it at a high level. We'll be digging into the deep details later on in part 2. For now we'll just be setting up a basic server and client with the socket module.

The server.py Script

Designate one of your VMs as our Server. In this case I'm using my Kali VM at 10.0.2.15.

Here's our server code:


First, we import the socket module and declare a variable for our servers IP address and the port we want to bind to. Below I will include links to the Python documentation to these modules so you can read up on it.

socket.socket(args)
Next we create an instance of the socket class with the args that define the family type and the socket type.
The family type will define what type of addressing we are trying to use. Typically this will be IPv4, or AF_INET. You would use AF_INET6 for IPv6, for example.
The socket type will define what type of data encapsulation we want to use in an IP datagram. SOCK_STREAM is for TCP. SOCK_DGRAM is for UDP. 
s.bind(args)
We then bind our interface to listen on port 12345
s.listen(args)
This specifies the maximum amount of queued connections. Self explanitory.
s.accept(args)
Tells our server to accept a connection on the bound port. You have to have a port bound for you to be able to accept a connection. It returns two objects: conn and addr. We create these objects with the conn, addr = s.accept() line. The conn object is a new socket (connection) object to a remote host where we can send and receive TCP data. Addr is the address of the remote host.
conn.send(args)
We send a string to the remote host over the new object we created called 'conn'. See previous section and the linked Python documentation if it's not making sense.
conn.close()
Close the 'conn' object to the remote host at 'addr.' This will close off our server and we will refuse any future connections until we create a new instance of socket.

The client.py Script

The other VM should be your client. This client will connect to our server and try to talk to it. In this case it will be my Ubuntu VM at 10.0.2.5. Here's the code:


There's only a couple of new things here that I will go over. We create a socket object, set it to connect to our server and attempt to connect it. We then tell our program to receive the response from our server and print it.

s.connect(args)
Connects to the server supplied in the argument. In this case we connect to our server at 10.0.2.15 over port 12345
s.recv_into(args)
Receives up to a the specified amount of bytes supplied in the argument. In our case we will receive up to the amount specified in our buffer. This will be a maximum of 30 bytes, and does not include TCP, IP or any other header/frame information.

 Putting it all together.

Start the server.py script first and the client.py script second. And here's our output!
ABOVE: Output from Server. We receive the IP of the system that connected and what port they connected over.
ABOVE: Output from Client


Breaking down the TCP Handshake

Great, so we connected a client to a server and received a message back. But what exactly happened behind the scenes? We can take a look by sniffing the local interface. On your server, setup wireshark and capture the interface that is assigned the IP as your server. There are plenty of "How to setup wireshark on Ubuntu" guides out there, so I won't bother mentioning it here. Setup is typically:
"sudo apt-get install wireshark". To run just type "sudo wireshark" to avoid any permissions issues trying to read the interface on a barebones Ubuntu install.

For my server VM, I only have 1 interface. I will be capturing eth0:
Fire up your server.py and client.py scripts again. You'll see the TCP stream come into wireshark right away. Right click on one of the packets and select "Follow TCP Stream"
You'll see our message in unpacked form on the right and hex on the left:
There may be other packet junk that got collected at the same time our client/server connection did (arp tables, dns queries from stuff in the background, etc.)
To filter out our client/server specifically. Right click one of the TCP packets and select "Conversation Filter"
We will now see just the messages between our client and server:

Capture A

TCP Play-by-play

The moment you hit enter and fired off your client.py script, the TCP handshake process began. These next steps happen on line 7 of our client.py code. From top down in Capture A:

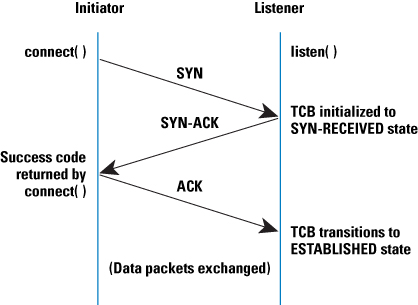
  1. First, our client from 10.0.2.5 sends a "SYN" out to our server at 10.0.2.15. We are telling the server at 10.0.2.15 that we want to synchronize with them. 
  2. Next, the server at 10.0.2.15 sends a "SYN-ACK". The server is acknowledging our request to synchronize with them.  
  3. Then, our client at 10.0.2.5 sends an ACK to our server at 10.0.2.15. The client is acknowledging it recieved the SYN-ACK from the previous step. At this point the connection state is set to ESTABLISHED. If you could pause the code here, you would see the ESTABLISHED flag with a tool like netstat on port 12345 on the client.
And that's all there is to it for establishing a connection with a TCP handshake. Here is a visual:

But what about all the other junk in there? Well that isn't part of the TCP handshake for establishing connections. Remember in our code we also sent data and closed the connection too. So let's jump to the next part of our code on line 11 of server.py:

  • The server at 10.0.2.15 sends a PSH to our client at 10.0.2.5. On line 11, our server sends a series of bytes out to whoever establishes a connection. You could say it acknowledges the connection is established, and pushes some data out to the client. From RFC 793:
The data that flows on a connection may be thought of as a stream of octets. The sending user indicates in each SEND call whether the data in that call (and any preceeding calls) should be immediately pushed through to the receiving user by the setting of the PUSH flag. 
If we open up that packet and expand the 'data' tab in wireshark, you'll see our message, a total of 21 bytes:

And the last bit of data is the TCP connection termination. Our code now has jumped to line 12 in server.py. Here's what's happening:

  1. The server at 10.0.2.15 sends a FIN-ACK out to the client at 10.0.2.5. You could say the server requests to finish the connection with the client on line 12 with s.close(). When Python closes the connection server side, it starts TCP connection termination process.
  2. The client at 10.0.2.5 sends an ACK to the server at 10.0.2.15. Our client.py acknowledges the server wants to close the connection.
  3. The client at 10.0.2.5 sends its FIN-ACK to the server at 10.0.2.15. Our client is now at line 11 in it's code. After receiving a request from the server it also will gracefully close the connection by also terminating at its end. 
  4. The server at 10.0.2.15 sends a final ACK to the client at 10.0.2.5 and the TCP stream is now set to CLOSED.
Here is a visual:

Doing some homework

I recommend digging through the packet capture of your entire TCP stream and trying to understand the TCP FLAGS section within the TCP header in Wireshark:

While digging for some resources to recommend and link to you guys/gals I found this resource that has a great summary of what we just went over.

Check it out and do another walk through of the entire TCP handshake and connection termination again looking at the flags. Hopefully now you can understand exactly what the result of running that code was.

In part 2 I will be going over the actual structure of a TCP packet, and some basic low-level manipulation of the TCP packets.