
This first part will go over very basic handling of TCP with Python, and should be a resource you're using to try to augment what you've probably already learned within networking. Later on I will be discussing the cool shit you can do via packet manipulation with Python (spoofing addresses, arp poisoning, etc.). But let's build up that foundation first. Hopefully after this you'll be able to understand the full stack of why things are happening with TCP and what's behind them.
Recommended Prior Knowledge:
To participate in these exercises, you'll need some basic knowledge of networking, virtualization, and basic skills with Python. I highly recommend Learn Python the Hard Way. Read that book and you'll be able to pick up the modules we'll be using in this series no problem.
Setup:
Virtual Machine Setup
You need two Linux boxes. For the purposes of this exercise, I recommend a Debian build like Ubuntu. It's what I'll be using, since no additional setup is needed beyond a bare-bones install of 14.04 LTS and an apt-get update && apt-get upgrade. Setup a couple Ubuntu VMs on your host machine in NAT mode (applies to either VMWare or VirtualBox):I'll be using VirtualBox. It's free here.
Unlike VMWare Player, we have to create a NAT. This can be done in the global preferences menu on the "Network" sidebar tab.

The defaults NAT settings will work for this exercise. Next we need to set our VM interface to use this NAT in order to be given a unique IP:

Fire up your VMs and grab their IPs with ifconfig, we'll need them for later.
Now our little lab setup looks like this:
Now everyone has an interface on the same subnet.

To launch gedit, search for it in the Unity launcher or just type 'gedit' into the terminal and hit enter.
Now go to Edit >> Preferences.
I recommend these settings, but again it's all personal preference. "Insert spaces instead of tabs" set to 4 is necessary though.


Now our little lab setup looks like this:

Gedit Setup
This step is optional, but I often see a lot of newbies get hung up on stupid crap. A lot of beginners get worried about needing some crazy IDE setup. 9/10 times for Python all you need is a text editor with syntax highlighting, like we'll setup here. Use whatever works best with you. Just don't use an IDE as a crutch, especially if you're just starting out.
Now go to Edit >> Preferences.
I recommend these settings, but again it's all personal preference. "Insert spaces instead of tabs" set to 4 is necessary though.


The Socket Module and You
Finally, let's get to writing some code! We'll be using Python's socket module. It's fantastic and really there is no reason you shouldn't be using it for anything involving Python and low level interaction with network interfaces. I'm not going to splat some code on here and call it a day, through. I'm going to walk you through it at a high level. We'll be digging into the deep details later on in part 2. For now we'll just be setting up a basic server and client with the socket module.
The server.py Script
Designate one of your VMs as our Server. In this case I'm using my Kali VM at 10.0.2.15.
Here's our server code:
First, we import the socket module and declare a variable for our servers IP address and the port we want to bind to. Below I will include links to the Python documentation to these modules so you can read up on it.
socket.socket(args)
There's only a couple of new things here that I will go over. We create a socket object, set it to connect to our server and attempt to connect it. We then tell our program to receive the response from our server and print it.
s.connect(args)
Here's our server code:
First, we import the socket module and declare a variable for our servers IP address and the port we want to bind to. Below I will include links to the Python documentation to these modules so you can read up on it.
socket.socket(args)
Next we create an instance of the socket class with the args that define the family type and the socket type.s.bind(args)
The family type will define what type of addressing we are trying to use. Typically this will be IPv4, or AF_INET. You would use AF_INET6 for IPv6, for example.
The socket type will define what type of data encapsulation we want to use in an IP datagram. SOCK_STREAM is for TCP. SOCK_DGRAM is for UDP.
We then bind our interface to listen on port 12345s.listen(args)
This specifies the maximum amount of queued connections. Self explanitory.s.accept(args)
Tells our server to accept a connection on the bound port. You have to have a port bound for you to be able to accept a connection. It returns two objects: conn and addr. We create these objects with the conn, addr = s.accept() line. The conn object is a new socket (connection) object to a remote host where we can send and receive TCP data. Addr is the address of the remote host.conn.send(args)
We send a string to the remote host over the new object we created called 'conn'. See previous section and the linked Python documentation if it's not making sense.conn.close()
Close the 'conn' object to the remote host at 'addr.' This will close off our server and we will refuse any future connections until we create a new instance of socket.
The client.py Script
The other VM should be your client. This client will connect to our server and try to talk to it. In this case it will be my Ubuntu VM at 10.0.2.5. Here's the code:
There's only a couple of new things here that I will go over. We create a socket object, set it to connect to our server and attempt to connect it. We then tell our program to receive the response from our server and print it.
s.connect(args)
Connects to the server supplied in the argument. In this case we connect to our server at 10.0.2.15 over port 12345s.recv_into(args)
Receives up to a the specified amount of bytes supplied in the argument. In our case we will receive up to the amount specified in our buffer. This will be a maximum of 30 bytes, and does not include TCP, IP or any other header/frame information.
Putting it all together.
Start the server.py script first and the client.py script second. And here's our output!

ABOVE: Output from Server. We receive the IP of the system that connected and what port they connected over.

ABOVE: Output from Client
Breaking down the TCP Handshake
Great, so we connected a client to a server and received a message back. But what exactly happened behind the scenes? We can take a look by sniffing the local interface. On your server, setup wireshark and capture the interface that is assigned the IP as your server. There are plenty of "How to setup wireshark on Ubuntu" guides out there, so I won't bother mentioning it here. Setup is typically:
"sudo apt-get install wireshark". To run just type "sudo wireshark" to avoid any permissions issues trying to read the interface on a barebones Ubuntu install.
"sudo apt-get install wireshark". To run just type "sudo wireshark" to avoid any permissions issues trying to read the interface on a barebones Ubuntu install.
For my server VM, I only have 1 interface. I will be capturing eth0:

Fire up your server.py and client.py scripts again. You'll see the TCP stream come into wireshark right away. Right click on one of the packets and select "Follow TCP Stream"
You'll see our message in unpacked form on the right and hex on the left:

There may be other packet junk that got collected at the same time our client/server connection did (arp tables, dns queries from stuff in the background, etc.)
To filter out our client/server specifically. Right click one of the TCP packets and select "Conversation Filter"
We will now see just the messages between our client and server:
To filter out our client/server specifically. Right click one of the TCP packets and select "Conversation Filter"
We will now see just the messages between our client and server:

Capture A
TCP Play-by-play
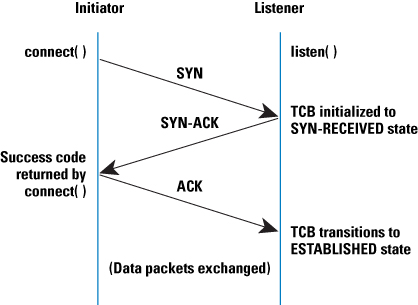
The moment you hit enter and fired off your client.py script, the TCP handshake process began. These next steps happen on line 7 of our client.py code. From top down in Capture A:
- First, our client from 10.0.2.5 sends a "SYN" out to our server at 10.0.2.15. We are telling the server at 10.0.2.15 that we want to synchronize with them.
- Next, the server at 10.0.2.15 sends a "SYN-ACK". The server is acknowledging our request to synchronize with them.
- Then, our client at 10.0.2.5 sends an ACK to our server at 10.0.2.15. The client is acknowledging it recieved the SYN-ACK from the previous step. At this point the connection state is set to ESTABLISHED. If you could pause the code here, you would see the ESTABLISHED flag with a tool like netstat on port 12345 on the client.
And that's all there is to it for establishing a connection with a TCP handshake. Here is a visual:
But what about all the other junk in there? Well that isn't part of the TCP handshake for establishing connections. Remember in our code we also sent data and closed the connection too. So let's jump to the next part of our code on line 11 of server.py:
- The server at 10.0.2.15 sends a PSH to our client at 10.0.2.5. On line 11, our server sends a series of bytes out to whoever establishes a connection. You could say it acknowledges the connection is established, and pushes some data out to the client. From RFC 793:
If we open up that packet and expand the 'data' tab in wireshark, you'll see our message, a total of 21 bytes:The data that flows on a connection may be thought of as a stream of octets. The sending user indicates in each SEND call whether the data in that call (and any preceeding calls) should be immediately pushed through to the receiving user by the setting of the PUSH flag.

And the last bit of data is the TCP connection termination. Our code now has jumped to line 12 in server.py. Here's what's happening:
- The server at 10.0.2.15 sends a FIN-ACK out to the client at 10.0.2.5. You could say the server requests to finish the connection with the client on line 12 with s.close(). When Python closes the connection server side, it starts TCP connection termination process.
- The client at 10.0.2.5 sends an ACK to the server at 10.0.2.15. Our client.py acknowledges the server wants to close the connection.
- The client at 10.0.2.5 sends its FIN-ACK to the server at 10.0.2.15. Our client is now at line 11 in it's code. After receiving a request from the server it also will gracefully close the connection by also terminating at its end.
- The server at 10.0.2.15 sends a final ACK to the client at 10.0.2.5 and the TCP stream is now set to CLOSED.
Here is a visual:

Doing some homework
I recommend digging through the packet capture of your entire TCP stream and trying to understand the TCP FLAGS section within the TCP header in Wireshark:

While digging for some resources to recommend and link to you guys/gals I found this resource that has a great summary of what we just went over.
Check it out and do another walk through of the entire TCP handshake and connection termination again looking at the flags. Hopefully now you can understand exactly what the result of running that code was.
In part 2 I will be going over the actual structure of a TCP packet, and some basic low-level manipulation of the TCP packets.
In part 2 I will be going over the actual structure of a TCP packet, and some basic low-level manipulation of the TCP packets.
This is great stuff. I'm really looking forward to part 2. Thank you!!!
ReplyDeletePart 2 is up :)!
Deletenice post.thanks
ReplyDeleteThanks alot! This was exactly what I "needed".
ReplyDelete
ReplyDeleteThe knowledge of python is very essential for the software developers. Python is a high level, general purpose, dynamic programming language that is of code readability and its synatx allows programmers to express the concept in fewer lines of code.
python training in chennai | python training institutes in chennai
This is a commendable article. python training in Chennai
ReplyDeleteExcellent and useful blog admin, I would like to read more about this topic.
ReplyDeletePython Training Institute in Chennai
Python Training in Chennai
DevOps Training in Chennai
ccna Training in Chennai
AWS Training in Chennai
Angularjs Training in Chennai
RPA Training in Chennai
R Training in Chennai
Looking good to read this post
ReplyDeleteR training in chennai
I would like to thank the blog admin for sharing this useful information in my vision. I have been searching for this blog for a while.
ReplyDeleteEnglish Speaking Classes in Mumbai
English Speaking Course in Mumbai
Best English Speaking Classes in Mumbai
Spoken English Classes in Mumbai
English Classes in Mumbai
Spoken English in Chennai
Spoken English Class in Chennai
Nice !! 👏👏👏
ReplyDeleteNow where can I find part 2 ?
Nice post.
ReplyDeletepython training
perde modelleri
ReplyDeleteMOBİL ONAY
mobil ödeme bozdurma
NFTNASİLALİNİR.COM
Ankara evden eve nakliyat
Trafik Sigortası
DEDEKTÖR
website kurma
ASK KİTAPLARİ
Good content. You write beautiful things.
ReplyDeletemrbahis
vbet
taksi
mrbahis
hacklink
sportsbet
sportsbet
korsan taksi
hacklink
Success Write content success. Thanks.
ReplyDeletekralbet
deneme bonusu
kıbrıs bahis siteleri
betmatik
betpark
canlı poker siteleri
betturkey
çorum
ReplyDeleteantep
ısparta
hatay
mersin
6İBL
salt likit
ReplyDeletesalt likit
840Y8
çeşme transfer
ReplyDeletesoulmate ajans
bor yağı filtre kağıdı
yağ süzme filtre kağıdı
R0QE
شركة مكافحة حشرات بالاحساء iigV9tIbgM
ReplyDeletePython Training in Pune
ReplyDeletePython Course in Pune
Python Classes in Pune
Python Certification in Pune
Python Training in Pune
Python Course in Pune
Python Classes in Pune
Python Certification in Pune
Python Training in Pune
Python Course in Pune
Our team attended the Azure DevOps Corporate Coaching Electronic City program and gained valuable knowledge about collaboration and release management.
ReplyDeleteI completely agree with your points regarding data privacy and secure enterprise integration patterns. Completing a rigorous GenAI Certification Training Electronic City curriculum is the most reliable way to demonstrate verifiable proof of capability to major global enterprise hiring teams.
ReplyDelete